
Import Module (Beta)
Missed by many users openITCOCKPIT finally got an generic interface to import host and services from external services and datasources. We invite everyone to provide feedback about the Beta version of the Import Module. The stable release of the module will be included with openITCOCKPIT 4.2
Architecture
The Import Module was designed to be easily extendable. It can be extended by submodules to add more data sources in future versions. The Beta version only supports to import data from .csv files.
More data sources are planned.
All imported hosts get stored into a dedicated table and the only required field is a hostname or an ip address.
Import data from .csv files
Before you can start the import, you need to create a new Import configuration which will contain a field mapping of openITCOCKPIT fields to your CSV file. For example the field hostname in openITCOCKPIT can match to a field fqdn in the CSV file.
This allows you to process any given CSV from any datasource. No special structure is required. It is also possible to create as many import configurations as needed to reuse the configuration for future imports.
CSV files can be uploaded by drag&drop. openITCOCKPIT will immediately start validating and processing of the uploaded file. A preview of the first few hosts is generated so the user can check that all fields are mapped correctly before the import starts. In case of errors or an invalid CSV file, the user will see an error message.
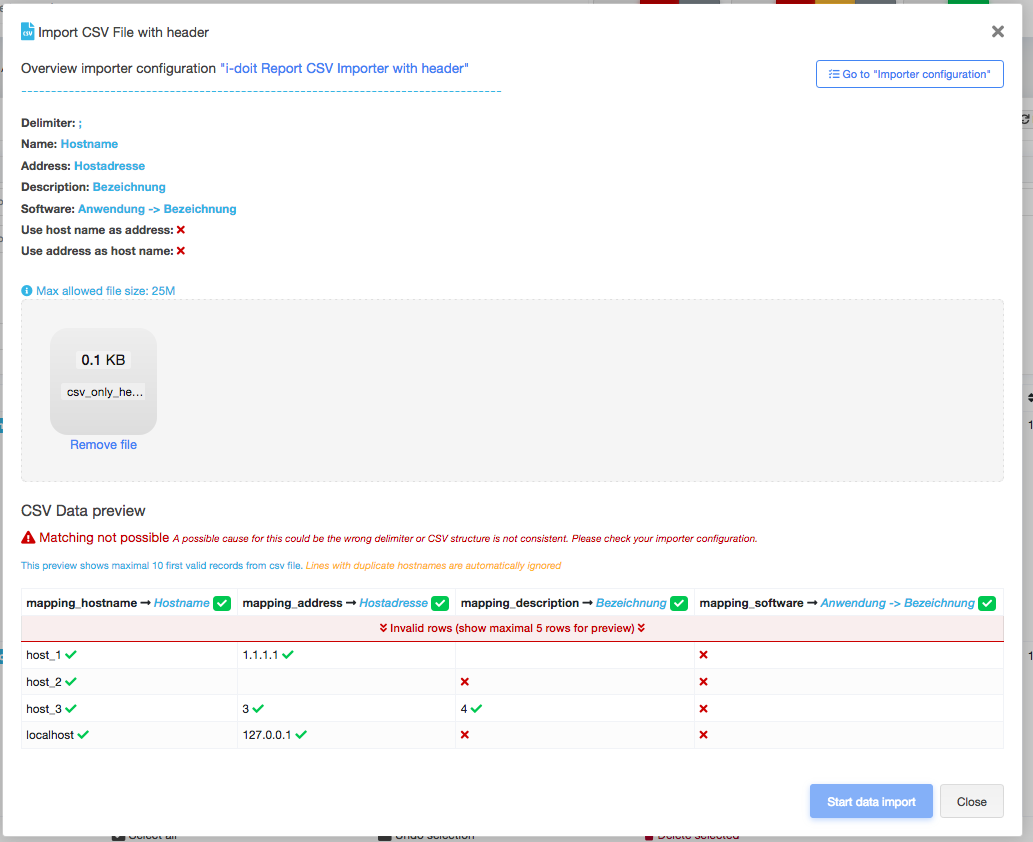
If the validation is successful the user can start the import
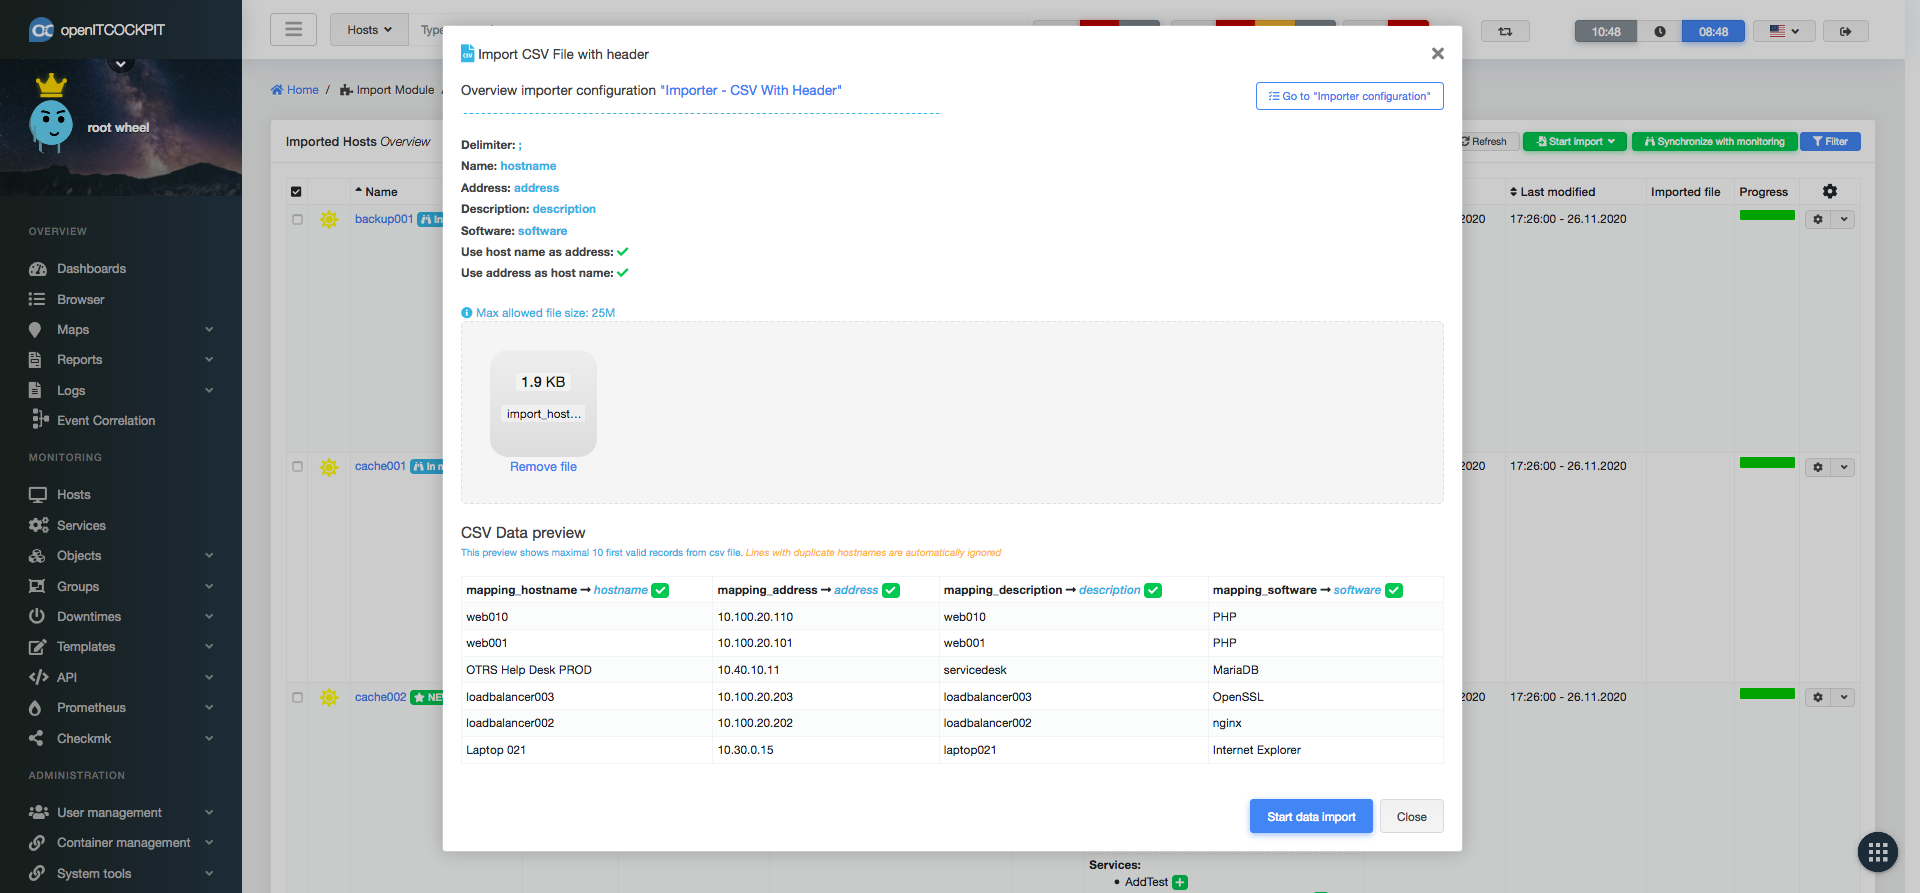
Before the imported hosts gets added to the monitoring additional or required information that where not part of the CSV can be added by the user.
Hosts that are already monitored are labeled by In monitoring and will be updated. New hosts are labeled with NEW

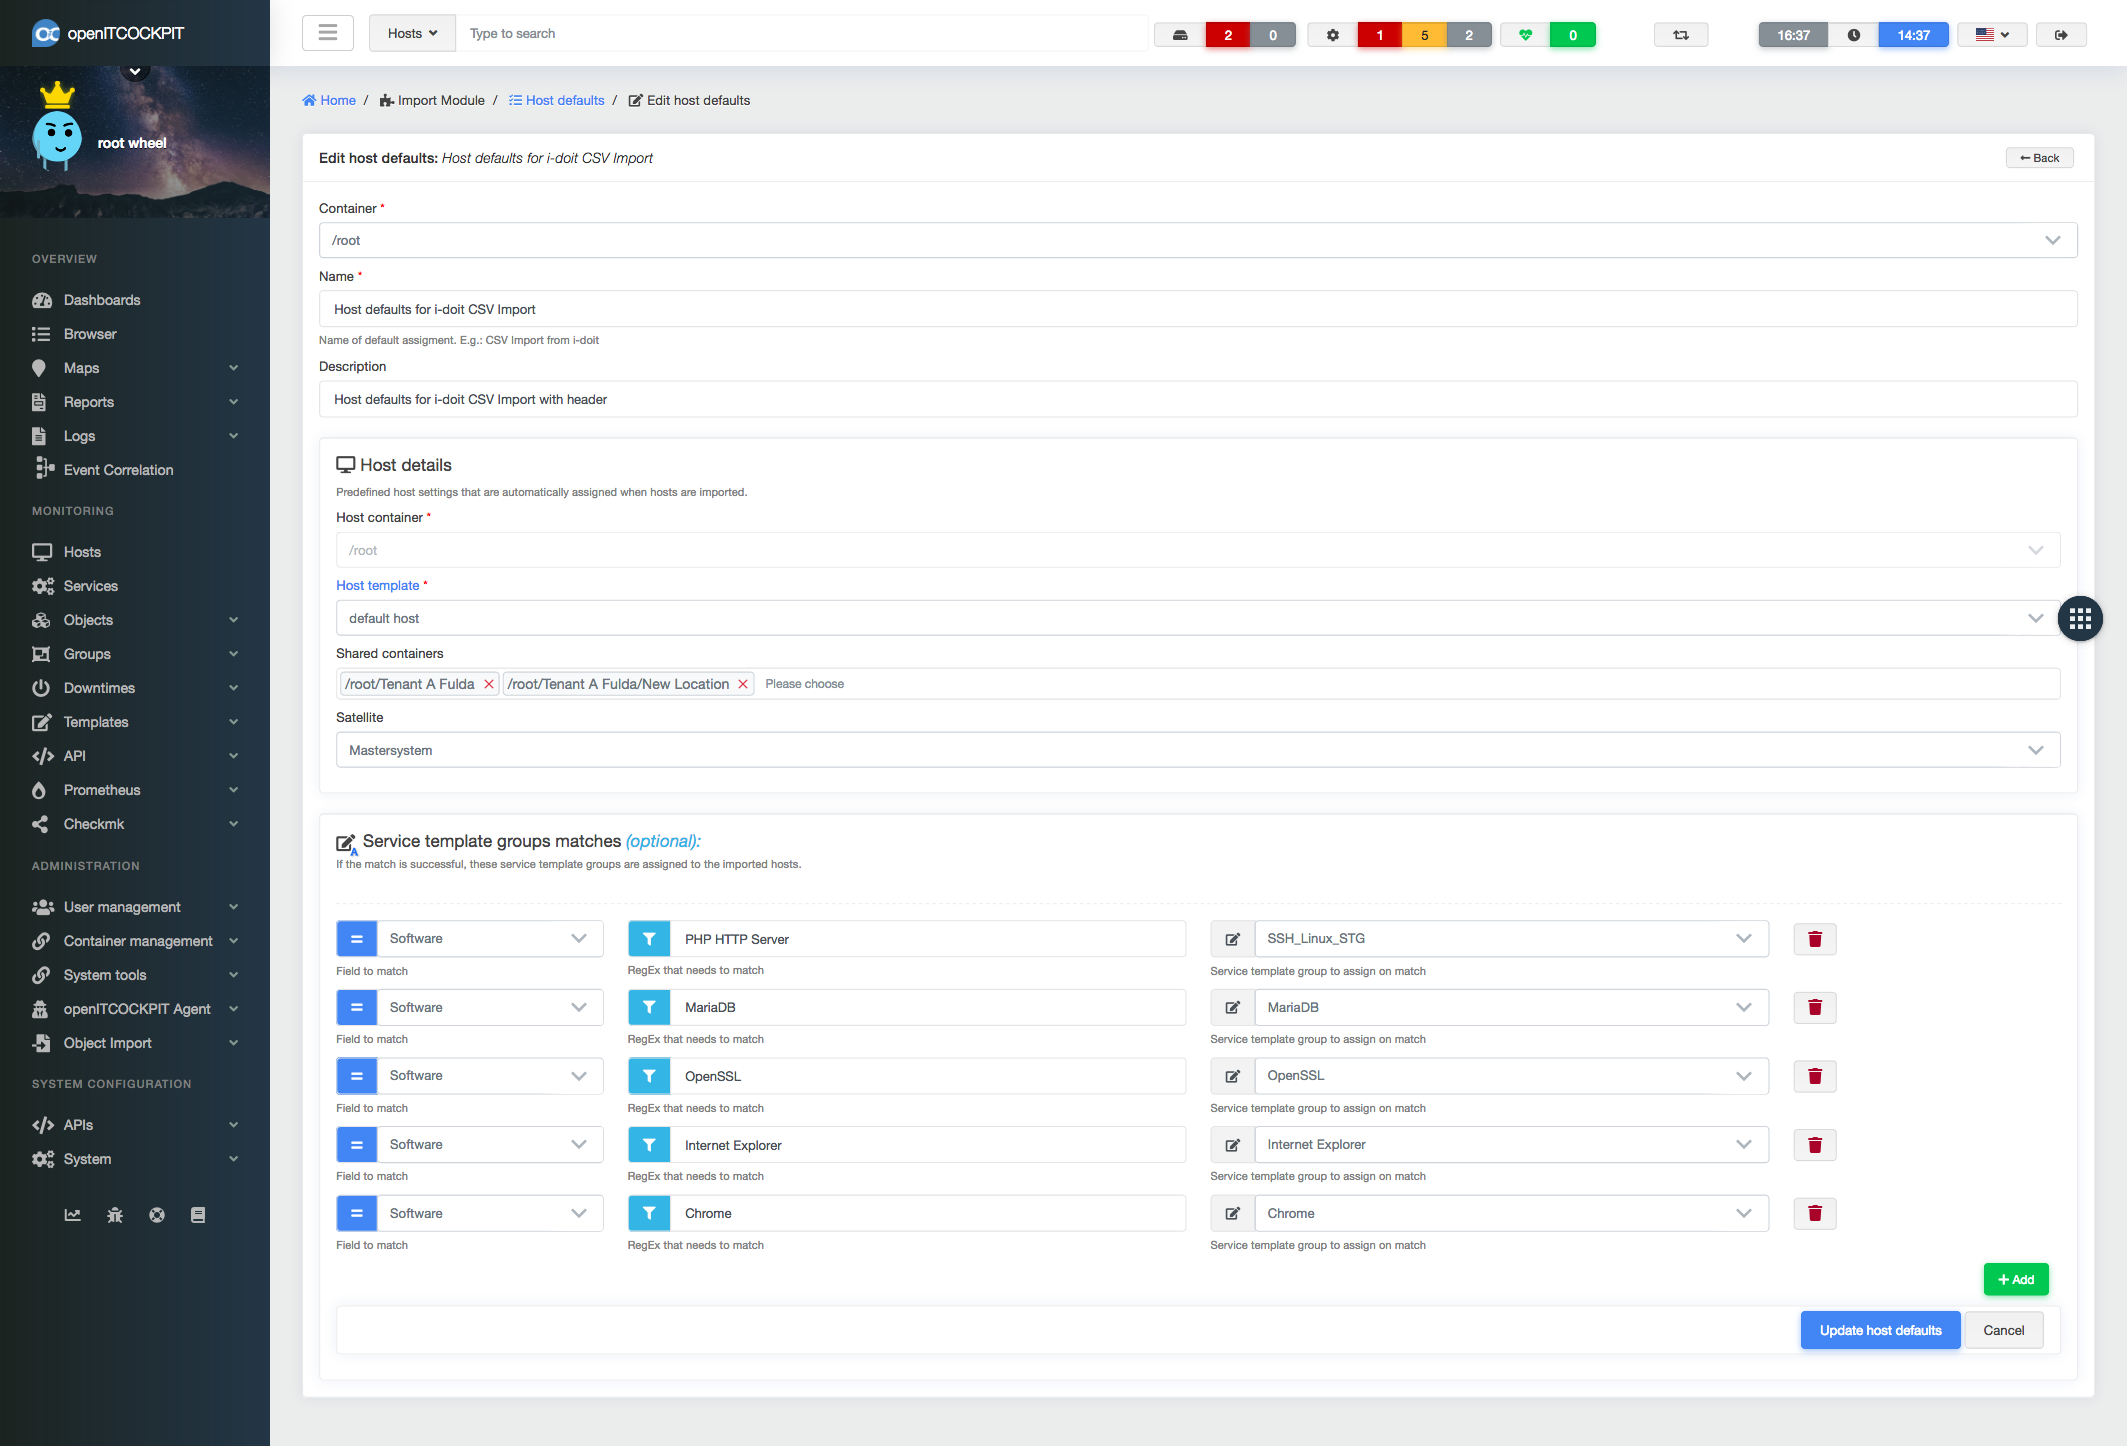
To automate most of the import processes the importer uses predefined Host defaults where defaults like an Container or host template can be defined as well as rules for automatically service deployment.
How to migrate from ImportModule to Import Module
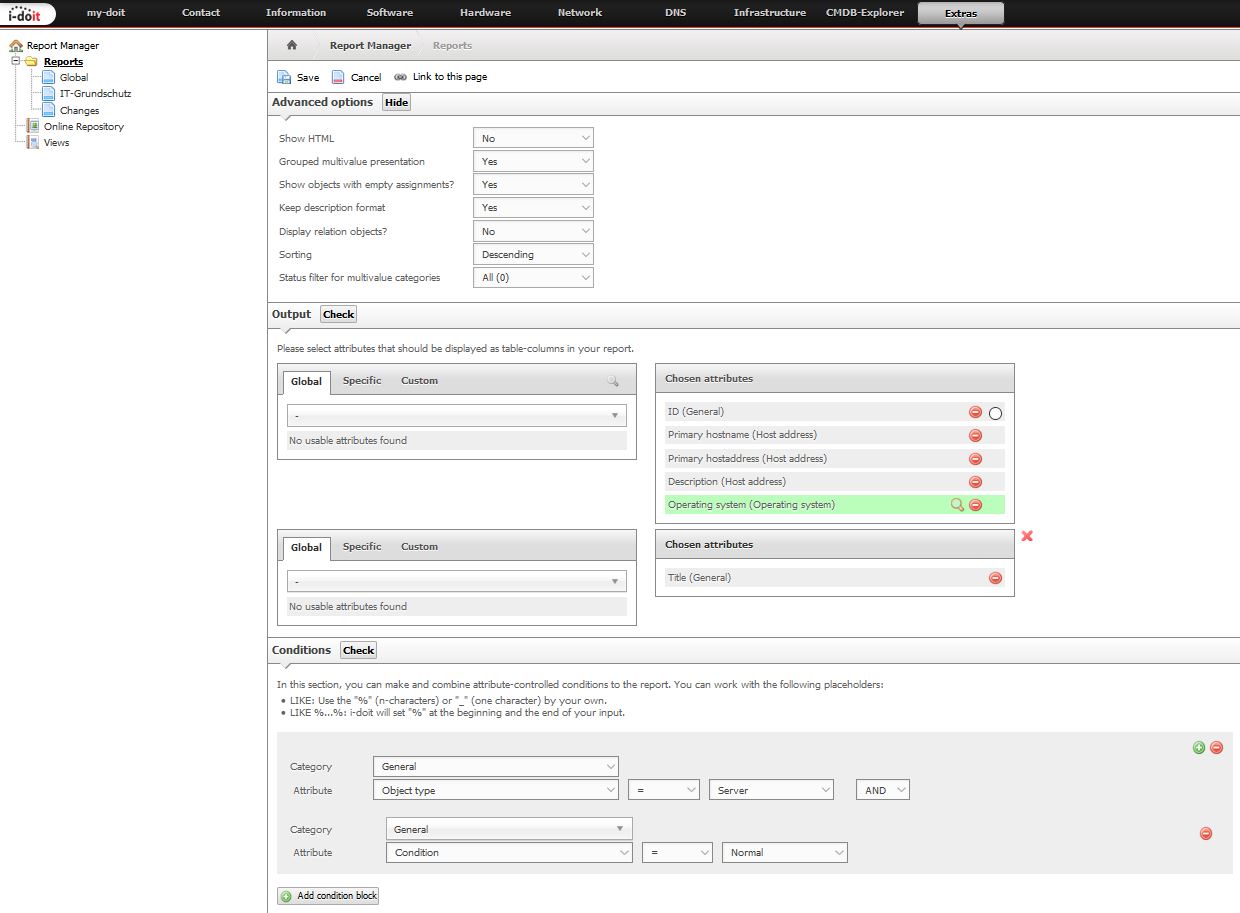
For an import from i-doit it is only necessary to build a suitable report with the report manager. The fields required for import are the Primary HostName, the Primary IP Address, the Operating System and, if you want, a description. It is of course also possible to use other fields if you configure a separate category for example and then document all the necessary data for monitoring. You can use the fields in your own report that provide the necessary information for an import. In the shown example, however, we assume a simple default configuration. You can take them as an example but completely customize them for your installation.
For our beta there is no direct API interface that calls the report. You can still automate it via cronjobs, but that wouldn’t be necessary in the stable version. we recommend that you trigger the import manually.
FROM isys_obj AS obj_main
INNER JOIN isys_cmdb_status AS obj_main_status ON obj_main_status.isys_cmdb_status__id = obj_main.isys_obj__isys_cmdb_status__id
LEFT JOIN isys_catg_application_list AS j3 ON j3.isys_catg_application_list__isys_obj__id = obj_main.isys_obj__id
LEFT JOIN isys_connection AS j2 ON j2.isys_connection__id = j3.isys_catg_application_list__isys_connection__id AND j3.isys_catg_application_list__isys_catg_application_priority__id = 1
LEFT JOIN isys_obj AS job2 ON j2.isys_connection__isys_obj__id = job2.isys_obj__id
LEFT JOIN isys_catg_ip_list AS j5 ON j5.isys_catg_ip_list__isys_obj__id = obj_main.isys_obj__id
LEFT JOIN isys_obj AS j7 ON j7.isys_obj__id = job2.isys_obj__id
LEFT JOIN isys_obj_type AS j8 ON j8.isys_obj_type__id = obj_main.isys_obj__isys_obj_type__id
WHERE TRUE
AND ( (j8.isys_obj_type__id != ‘60’ ) AND (j8.isys_obj_type__id != ‘63’ ) ) AND ( (j8.isys_obj_type__id = ‘5’ ) AND obj_main.isys_obj__status = ‘2’ )
AND ( (j3.isys_catg_application_list__id IS NULL) OR (job2.isys_obj__title IS NOT NULL) OR (j3.isys_catg_application_list__isys_catg_application_type__id = 2) )
ORDER BY obj_main.isys_obj__id DESC
## Automatically allocation of service template groups by matching host groups
The drop down menu beside "Create host" was expanded with the feature "Save host and assign matching service template groups". The system will iterate through all host groups that are assigned to the given host and
check if an service template group with the exact same name exists. If a service template group gets found, all the services will be created on the host. If one service template is part of multiple service template groups, the service will **not** get created multiple times.

If an hostgroup gets removed from the host, all corresponding services will get disabled - not deleted.

<div class="col-xs-12">
<a href="/assets/images/blog/4.1.4/update_host_with_matching.png" data-lightbox="repository-blog-set" data-title="Create services dynamically with mapping host group">
    <img src="/assets/images/blog/4.1.4/update_host_with_matching.png" class="img-responsive padding-bottom-15" alt="Create services dynamically with mapping host group"/>
</a>
</div>


### Host and Service status overview

#### Host and Service macros

Host and service macros are often used to store sensitive information like passwords or SNMP communities. To protect them it is now possible to mark certain macros as password macros.
When `FRONTEND.REPLACE_PASSWORD_IN_OBJECT_MACROS` is enabled in <kbd><kbd>System</kbd> <i class="fa fa-arrow-right"></i> <kbd>System Settings</kbd></kbd> openITCOCKPIt will not replace the macro name with the content of the macro anymore.

No replacement of host macro names that are marked as password (default):
<div class="col-xs-12">
<a href="/assets/images/blog/4.1.4/hide_password.png" data-lightbox="repository-blog-set" data-title="No replace custom macros with password option in status view">
    <img src="/assets/images/blog/4.1.4/hide_password.png" class="img-responsive padding-bottom-15" alt="No replace custom macros with password option in status view"/>
</a>
</div>

Macro names get replaced with the actual value:
<div class="col-xs-12">
<a href="/assets/images/blog/4.1.4/show_password.png" data-lightbox="repository-blog-set" data-title="Replace custom macros with password option in status view">
    <img src="/assets/images/blog/4.1.4/show_password.png" class="img-responsive padding-bottom-15" alt="Replace custom macros with password option in status view"/>
</a>
</div>


#### Last time Up/Ok
As soon as an host or serivce is in a non Ok state, openITCOCKPIT will display when the host or services was the last time ok.


<div class="col-xs-12">
<a href="/assets/images/blog/4.1.4/up_state.png" data-lightbox="repository-blog-set" data-title="Show date for last UP/OK State in host and service status overview">
    <img src="/assets/images/blog/4.1.4/up_state.png" class="img-responsive padding-bottom-15" alt="Show date for last UP/OK State in host and service status overview"/>
</a>
</div>


<br>
#### All changes are available in the [changelog](https://github.com/openITCOCKPIT/openITCOCKPIT/releases/tag/openITCOCKPIT-4.1.4).

## How to Update
tmux sudo apt-get update sudo apt-get dist-upgrade
<br>

Happy holidays and all the best - your openITCOCKPIT Team 🎄